Penetration testing is a crucial process that involves simulating real cyber-attacks on applications and systems to uncover potential security vulnerabilities exploitable by attackers. This comprehensive approach encompasses various types of security testing, which safeguards against malicious actors seeking to compromise sensitive information and systems. While certain aspects of penetration testing can be automated, leveraging automated penetration testing tools enables organizations to proactively identify security weaknesses before hackers have a chance to exploit them.
Manual penetration testing offers a snapshot of security at a specific point in time. However, it may not account for newly discovered vulnerabilities or those introduced through development errors between testing cycles. Here, the value of an automated pen testing platform becomes evident, as it empowers organizations to continuously monitor and mitigate threats. By conducting regular vulnerability scans, these platforms automatically pinpoint security holes in applications and systems, ensuring timely actions are taken to eliminate risks and protect the business from potential cyber threats.
What is Sec-Sci AutoPT?
Sec-Sci AutoPT, an Automated Penetration Testing (AutoPT) framework, has undergone a remarkable evolution since its inception in 2017 as version 1 tailored for HP WebInspect. Transitioning to BurpSuite Pro in 2019 marked a strategic move, driven by considerations of cost-effectiveness and a desire for a more streamlined implementation.
The version 5 was released in July 2024. Sec-Sci AutoPT stands as a testament to continuous improvement. It caters to a broader user base with support for multiplatform operating systems, particularly MS Windows and Linux-based machines. The latest iteration boasts enhanced manageability, accelerated performance, an even more user-friendly implementation and heightened security through encryption for accounts, credentials, and certificates. A host of new features further enrich its capabilities, making it a cutting-edge solution in the field of penetration testing automation.
This open-source framework is a meticulously crafted proof of concept (POC), designed to simplify the intricate task of identifying and mitigating security vulnerabilities in applications and systems. Its strength lies in the seamless integration of various tools such as BurpSuite Pro, Docker, Cucumber, Cypress, Selenium, Robot Framework, and Python. These tools combined, they orchestrate a comprehensive and automated penetration testing workflow, ensuring a thorough assessment and discovery of potential weaknesses.
Sec-Sci AutoPT doesn't rest on its laurels; it remains committed to regular updates and improvements, staying at the forefront of innovation in penetration testing automation.
Key Features and Functionality:
- Automated Scanning: The framework automatically sets the project to scan, initiating the automated scanning process using BurpSuite Pro. It allows for quick and accurate vulnerability assessments of web applications.
- Continuous Integration: Sec-Sci AutoPT is integrated into the build pipeline through a Continuous Integration (CI). It efficiently fetches docker images from the repository and triggers the pen testing process as needed.
- Versatile Testing Environment: The framework ensures consistent and isolated testing environments by utilizing Docker containerization. This enables efficient deployment and management of different testing setups.
- Customizable Automation: The integration of Cucumber, Cypress, Selenium, and Robot Framework provides a customizable and extendable automation capability. It supports both API service calls functionality testing and UI functionality testing.
- Security Assessment and Reporting: The automated pen testing platform executes the QA acceptance testing, running the appropriate testing tools (e.g., Docker, Cucumber, Cypress, Selenium, Robot Framework, and/or Python) based on the project type. It allows for a thorough vulnerability scan process.
- Efficient Vulnerability Management: The framework allocates sufficient time for the vulnerability scan process to complete, ensuring comprehensive coverage of the target. Upon completion, it automatically closes Burp and archives old vulnerability reports for historical reference.
- Clear and Informative Reporting: Sec-Sci AutoPT generates comprehensive vulnerability reports and presented in an easy to understand manageable dashboard. It also sends email notifications to relevant stakeholders, providing concise summaries of the security assessment results.
Benefits:
- Timely Vulnerability Detection: Active vulnerabilities and weaknesses within the application are identified at an earlier stage of the development life cycle.
- Streamlined Automated Testing: Simplifying automated security testing empowers its execution at any moment, as required. This on-demand capability effortlessly integrates into the build pipeline, enabling dynamic pentesting of applications or services. By scanning new code or configuration changes, potential exploitable vulnerabilities are promptly identified—eliminating the reliance on infrequent annual pentesting reports.
- Enhanced Testing Speed and Clarity: The speed of testing and subsequent reporting far surpasses that of manual alternatives. The generated reports are presented in a user-friendly format for ease of understanding.
- Eliminating Reporting Delays: Bid farewell to prolonged waits for reports crafted by human hands. A critical drawback of human-led pentests is exposed—due to continuous delivery's rapid pace, numerous reports become obsolete before reaching stakeholders. With the application undergoing multiple updates since the last pentest, a fresh array of potential vulnerabilities and misconfigurations can emerge, unseen in prior evaluations. Traditional pentesting, therefore, portrays a mere snapshot of the application's security stance at a single point in time.
- Comprehensive Reusability: Leveraging QA, functionality, and acceptance testing automation scripts, the application undergoes meticulous end-to-end testing to uncover any lurking security holes or vulnerabilities.
- Versatile Execution: The approach readily adapts to diverse scenarios, allowing for execution across multiple instances for thorough assessment.
- User-Friendly Implementation: Implementation and usage are seamlessly straightforward, ensuring accessibility to a wide range of users.
- Reduced Manual Effort and Human Error: Reduces manual effort and the potential for human error in the penetration testing process. This enhances efficiency and reliability.
- Continuous Monitoring and Assessment: The framework allows for continuous security monitoring and assessment, enabling proactive identification and remediation of vulnerabilities.
- Comprehensive Security Assessment: Integration with various tools facilitates comprehensive security assessment, covering both API and UI.
- Accelerated Vulnerability Identification: By automating vulnerability scanning, Sec-Sci AutoPT accelerates the identification of security weaknesses, reducing the risk of potential exploitation by malicious actors.
- Effective Communication and Collaboration: Clear reporting and email notifications ensure effective communication and collaboration among team members and stakeholders.
- Open-Source Advantage: The framework holds the distinct advantage of being both free and open-source software (OSS). This characteristic facilitates unhindered accessibility to any individual acquiring a copy of the framework and its accompanying documentation files, devoid of limitations. This encompasses a spectrum of rights, encompassing the liberty to use, copy, modify, merge, publish, and distribute the software, ensuring a comprehensive empowerment for users in the hope that it will be useful.
- Integration with Various Tools: This framework offers seamless integration capabilities with popular Pentest Reporting and Collaboration Platforms, including Reporter, Cyver Core, PlexTrac, AttackForge, and Pentest-Collaboration-Framework.
Overall, Sec-Sci AutoPT empowers organizations to adopt a proactive and systematic approach to security testing, improving their overall security posture and safeguarding their applications and systems against potential threats.
Exploring Additional Benefits:
- Diversity Among Organizations: Every organization possesses its unique characteristics and requirements. The automation code or script, which serves as a standard foundation, can be tailored to suit the specific circumstances and preferences of each organization. This adaptability empowers users to modify and customize the automation script according to their existing setups and immediate needs.
- Flexibility in Implementation: Sec-Sci AutoPT stands out due to its inherent flexibility. This adaptability means that the framework is not bound by rigid structures, allowing it to seamlessly integrate into a variety of organizational contexts. This adaptability ensures that the tool can evolve in tandem with the ever-changing demands and dynamics of different environments.
In essence, the adaptability and flexibility of Sec-Sci AutoPT empower organizations to harness its potential in a manner that aligns precisely with their distinct requirements, fostering optimal outcomes and efficiency.
Considerations:
- Prerequisite: It assumes the presence of QA/Functionality/Acceptance Testing Automation in advance.
- Validation and Analysis Requirement: The need for false positive validation or human analysis is vital. Similar to any novel tool or process, there's an initial cost during the first run to assess the outcomes. With subsequent runs, the review process becomes more streamlined, requiring less involvement.
- Limited Understanding of Applications: The tool lacks an inherent understanding of web applications or services. Its operation is driven by commands and variables. Like other tools, they lack the human-like common sense required to determine whether a specific issue is a false positive or not. For instance, tools can detect vulnerabilities, but they may fail to comprehend that an application harbors an insecure direct object reference (IDOR) vulnerability within an internal API, or a server-side request forgery (SSRF) in an internal webpage that a human pentester can exploit for further pivoting.
The effectiveness of Sec-Sci AutoPT hinges on addressing these critical considerations, which are vital for ensuring an accurate and comprehensive vulnerability assessment. By meticulously tackling these factors, the software can confidently pinpoint and evaluate vulnerabilities within a given application or service, ultimately enhancing its capacity to deliver valuable insights and bolster cybersecurity measures.
Sec-Sci AutoPT Framework
The Sec-Sci AutoPT Framework is an innovative and comprehensive thoroughly vetted proof of concept (POC) penetration testing automation framework. It leverages a powerful combination of cutting-edge tools, including BurpSuite Pro, Docker, Cucumber, Cypress, Selenium, and Python. The framework streamlines the penetration testing process by integrating these tools into a cohesive pipeline.
Here's how the pen testing automation works within the build pipeline, as depicted in the following diagram: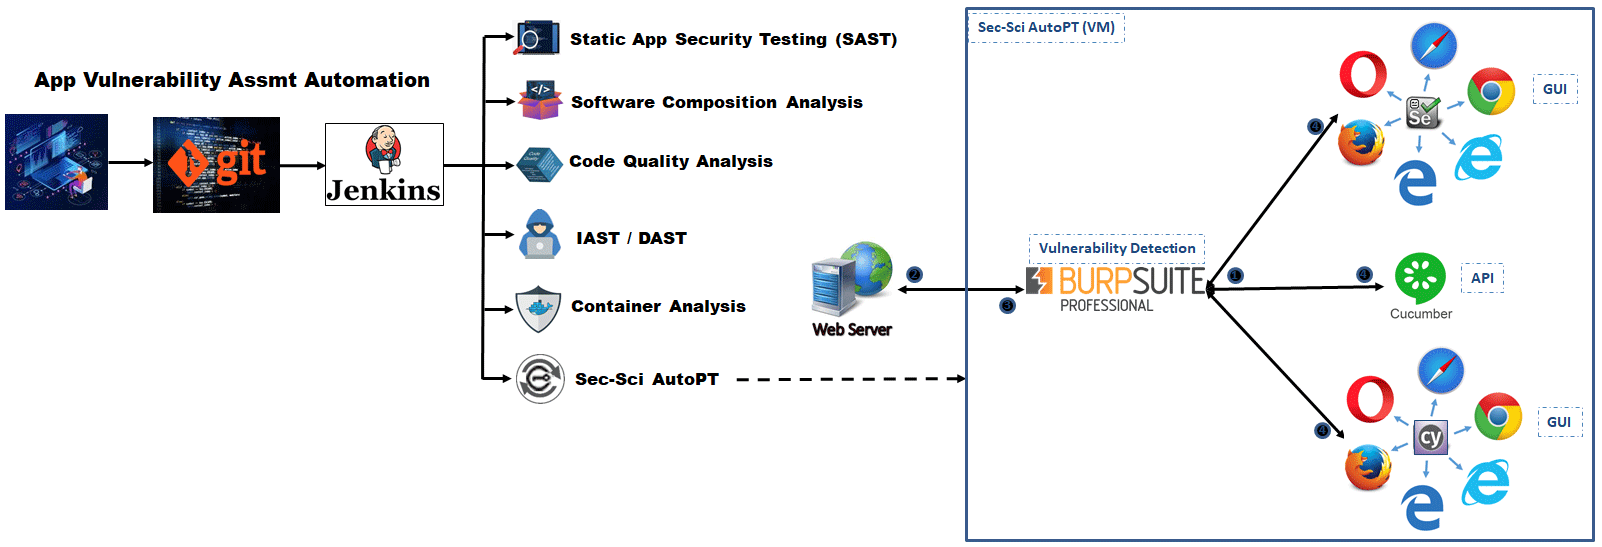
- BurpSuite Pro: This robust tool serves as the foundation of the framework, enabling comprehensive vulnerability scanning and analysis of web applications.
- Docker: By utilizing containerization, the framework ensures seamless deployment and management of various testing environments, improving efficiency and consistency.
- Cucumber: This behavior-driven development tool facilitates collaboration between team members, promoting clear communication of test scenarios and enhancing the overall testing process.
- Cypress and Selenium: Both are used for automated testing of web applications, providing reliable and repeatable results.
- Python: As a versatile scripting language, Python plays a key role in customizing and extending the automation capabilities of the framework.
By combining these powerful tools, the Sec-Sci AutoPT Framework streamlines the penetration testing workflow, enabling faster and more accurate identification of security vulnerabilities in applications. This automation not only saves time and effort but also enhances the overall security posture of the tested systems.
Sec-Sci AutoPT Implementation Diagram
The Sec-Sci AutoPT Implementation Diagram provides an overview of the architecture and flow of the pen testing automation process using the Sec-Sci AutoPT Framework. It illustrates how various tools are integrated into a seamless pipeline to conduct automated penetration testing. Please note that the diagram is a high-level representation, and specific details may vary based on the organization's setup.
The Sec-Sci AutoPT Implementation Diagram showcases how the automated penetration testing process is seamlessly integrated into the build pipeline. It enables organizations to identify security weaknesses proactively, leading to enhanced security, reduced risk, and improved overall software quality. Once the job or build started, Sec-Sci AutoPT will:
- Create {Project Name}-{Type}.job file in Job folder: Initiate the project by creating a specific start file with the project name and type in the "Job" folder. Type codes are as follows:
- dkr is for Docker
- ccb is for Cucumber
- cyp is for Cypress
- rfw is for Robot Framework
- dkr is for Docker
- Set Project to Scan: Configure the scanning parameters and specify the project to be scanned for vulnerabilities.
- Delete Trigger (.job) File: Remove the trigger file to initiate the scanning process and proceed with the next steps.
- Copy New or Updated Automation Config Files to Repo Folder: Transfer the new or updated pen test automation configuration files to the "Repo" folder for version control.
- Copy Project-Related Files to WS Folder: Depending on the project type:
- For Docker: Pull the Docker image from the repository and copy other project-related files to the "WS" (Workspace) folder.
- For Cucumber/Cypress/Selenium/Robot Framework: Copy the respective tools (Cucumber or Cypress/Selenium/Robot Framework) and associated files, including the Burp Project Template and Burp Project Options files, to the "WS" folder.
- For Docker: Pull the Docker image from the repository and copy other project-related files to the "WS" (Workspace) folder.
- Delete Burp Temp Files: Clear any temporary files generated by Burp to ensure a clean start.
- Run Burp with Project Template and Configuration Options: Launch Burp with the specified project template and configuration options for vulnerability scanning.
- Run QA Acceptance Testing: Perform the QA acceptance testing process, which includes:
- Running Docker container (if applicable)
- Executing Cucumber (API Service Calls Functionality Testing) or Cypress/Selenium/Robot Framework (UI Functionality Testing)
- Running Docker container (if applicable)
- Intercept Request and Response Traffic: During this process, Burp proxy tool intercepts HTTP/HTTPS requests and responses. The tool acts as a middleman, sitting between the client and the server, capturing the data exchanged between them.
- Run Vulnerability Scan Process: Discovery of security flaws, such as improper handling of user inputs, sensitive information exposure, injection vulnerabilities, and more.
- Close Burp After Scan is Completed: Automatically close Burp after the vulnerability scan has finished.
- Archive Old Vulnerability Reports: Store previous vulnerability reports in an archive for historical reference.
- Export Burp Vulnerability Report to Reports Folder: Save the current vulnerability report generated by Burp in the designated "Reports" folder.
- Copy Completed Scan's .burp File to Reports Folder: Transfer the .burp file generated from the completed scan to the "Reports" folder.
- Delete Execution Temp Files: Clean up temporary files used during the execution of the assessment.
- Send Mail Notification After Completing the Security Assessment: Send a notification email to relevant stakeholders once the security assessment is finished. A sample email notification may include pertinent details about the assessment results and any critical findings.
Installation Instructions for MS Windows and Linux-Based OS
The following is the installation instructions for Sec-Sci AutoPT, the Automated Penetration Testing framework. These instructions guide users through the process of setting up and configuring the framework to enable automated vulnerability scanning and testing.
Prerequisites
- Ensure that the target system meets the minimum requirements for running Sec-Sci AutoPT. This may include specific hardware specifications, operating system versions, and software dependencies.
- Microsoft Windows 10 (or later) or Linux
- BurpSuite Professional (latest stable version)
- Java (OpenJDK 19.0.2 or latest stable version): Required to run BurpSuite Pro
- For running Cucumber project, use java version that works for the application
- For running Jenkins, use Java 11, Java 17, or Java 21
- Python 3.9.x (latest stable version): Required to run Sec-Sci AutoPT
- For running RobotFramework project, use java version that works for the application
- Jython 2.7.2 (latest stable version): Required to run python script BurpSuite Extension
- Windows Subsystem for Linux (WSL) version 2.0 or later
- Docker Desktop (latest stable version)
- GCloud CLI (Google Cloud SDK or latest stable version): Required if Docker images are stored in Google Container Registry
- Node.js (latest stable version): Required for Non-Docker like Cypress
- Cypress, Selenium, Robot Framework (application specific version): Required for non-containerized test
- Jenkins (latest stable version)
- XAMPP PHP 5.6+ (Recommended) or Internet Information Services version 10.0+
- SendGrid (Mail API) Token or SMTP (Gmail account will work, please refer to this link: https://support.google.com/mail/answer/185833)
- GnuPG 2.4.3 or later
- OpenSSL v3.1.4 (latest stable version): Required for importing keys and certificates into keystore
- Microsoft Windows 10 (or later) or Linux
Step 1: Install Sec-Sci AutoPT
- Obtain the latest version of Sec-Sci AutoPT from the official repository [ Download Latest Version ].
.
git clone https://github.com/securityscience/secsci-autopt.git - Download and extract the downloaded package to a preferred directory.
- Install Python dependency modules using the following command:
cd <Sec-Sci AutoPT Installation Directory>
pip install -r requirements.txt - Create Directory Junction Link of Repo folder in Reports folder using the following command:
For Windows
mklink /J /<Sec-Sci AutoPT Installation Directory>/Reports/Repo /<Sec-Sci AutoPT Installation Directory>/Repo
For Linux
ln -s /<Sec-Sci AutoPT Installation Directory>/Repo /<Sec-Sci AutoPT Installation Directory>/Reports/Repo - Create Shortcut of SecSciAutoPTStart.cmd and LockWindows.cmd in Startup folder (for Windows Only)
- Download Shortcut: https://optimumx.com/download/Shortcut.zip
- Create shortcut of SecSciAutoPTStart.cmd using the following command:
Shortcut /F:"%APPDATA%/Microsoft/Windows/Start Menu/Programs/Startup/SecSciAutoPTStart.lnk" /A:C /T:"/<Sec-Sci AutoPT Installation Directory>/SecSciAutoPTStart.cmd" /W:"/<Sec-Sci AutoPT Installation Directory>" - Create Shortcut of LockWindows.cmd using the following command:
Shortcut /F:"%APPDATA%/Microsoft/Windows/Start Menu/Programs/Startup/LockWindows.lnk" /A:C /T:"/<Sec-Sci AutoPT Installation Directory>/LockWindows.cmd" /W:"/<Sec-Sci AutoPT Installation Directory>" - Set Windows Auto Login
REG ADD "HKLM\Software\Microsoft\Windows NT\CurrentVersion\Winlogon" /v AutoAdminLogon /t REG_SZ /d 1 /f
REG ADD "HKLM\Software\Microsoft\Windows NT\CurrentVersion\Winlogon" /v DefaultDomainName /t REG_SZ /d %COMPUTERNAME% /f
REG ADD "HKLM\Software\Microsoft\Windows NT\CurrentVersion\Winlogon" /v DefaultUserName /t REG_SZ /d MYUSERNAME /f
REG ADD "HKLM\Software\Microsoft\Windows NT\CurrentVersion\Winlogon" /v DefaultPassword /t REG_SZ /d MYPASSWORD /f
Step 2: Install Dependencies
- Check the list of tools integrated into Sec-Sci AutoPT, such as BurpSuite Pro, Docker Desktop, Cucumber, Cypress, Selenium, Python among others.
- Ensure that each of these tools is installed and configured correctly on the system.
- Java SE Development Kit:
- Installer: https://jdk.java.net/archive or https://www.oracle.com/java/technologies/javase/jdk19-archive-downloads.html
- Download and setup Java SE Development Kit
- Run the following command to set PATH environment variable for Java
- Python and Jython:
- Installer (Python): https://www.python.org/downloads
- Installer (Jython): https://www.jython.org/download.html
- Download and setup Python / Jython
- Run the following command to set PATH environment variable for Python / Jython
For Windows:
set PATH=%PATH%;/path/to/Python
set PATH=%PATH%;/path/to/Python/Scripts
python --version
set PATH=%PATH%;/path/to/Jython
jython --version
For Linux:
export PATH=%PATH%;/path/to/Python
export PATH=%PATH%;/path/to/Python/Scripts
python --version
export PATH=%PATH%;/path/to/Jython
jython --version - Install Python dependency modules using the following command:
cd <Sec-Sci AutoPT Installation Directory>
pip install -r requirements.txt
- Installer (Python): https://www.python.org/downloads
- GnuPG
- Installer: https://www.gpg4win.org/download.html
- Download and setup GnuPG
- OpenSSL:
- Installer: https://slproweb.com/products/Win32OpenSSL.html
- Download and setup OpenSSL
- Run the following command to set PATH environment variable for OpenSSL
For Windows:
set PATH=%PATH%;/path/to/OpenSSL/bin
openssl version
For Linux:
export PATH=%PATH%;/path/to/OpenSSL/bin
openssl version
- Burpsuite Pro
- Installer: https://portswigger.net/burp/pro
- Download and setup Burpsuite Pro
- Configure Burp User Options
¤ Go to User Options > Misc > Disable Auto-Updates
¤ Go to User Options > Misc > Temporary Files Location - Add xBurp and xReport Burp extenders (xBurp.py and xReport.py are in the Sec-Sci AutoPT package)
¤ Go to Extender > Options > Python Environment: Set Location of Jython standalone JAR File
¤ Go to Extender > Extensions: Click "Add" button and set Extension Details
Extension Type: Python
Extension File (.py): <set location of xBurp.py>
¤ Go to Extender > Extensions: Click "Add" button and set Extension Details
Extension Type: Python
Extension File (.py): <set location of xBurp.py>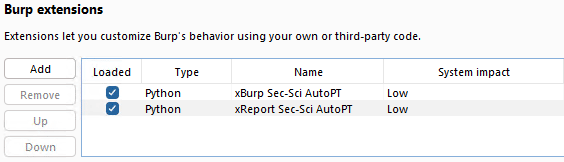
- WSL (for Windows):
- Installer: https://learn.microsoft.com/en-us/windows/wsl/install
- Run the following command to install WSL
wsl install
wsl --update
wsl --set-default-version 2
wsl --version
- Installer: https://learn.microsoft.com/en-us/windows/wsl/install
- Docker Desktop:
- Installer for Windows: https://docs.docker.com/desktop/install/windows-install
- Installer for Linux: https://docs.docker.com/desktop/install/linux-install
- Download and setup Docker Desktop
- Check Docker version
docker --version - Set proxy settings
¤ Go to Settings > Resources > Proxies > Manual proxy configuration
Web Server (HTTP): http://127.0.0.1:8080
Secure Web Server (HTTPS): http://127.0.0.1:8080
Bypass proxy settings for these hosts & domains: *.gcr.io,*.googleapis.com,*.docker.io,*.docker.com,*.debian.org,*.ubuntu.com,*.npmjs.org,*.alpinelinux.org
- Google Cloud CLI: This is required only if Docker Images are stored in Google Container Registry.
- Installer: https://cloud.google.com/sdk/docs/install
- Download and setup Google Cloud CLI
- Run the following command to configure Google Cloud CLI
¤ Check Google Cloud SDK version
gcloud --version
¤ Login to gcloud
gcloud auth login
¤ Configure Docker to use GCP
gcloud auth configure-docker
¤ Test Docker Pull
docker pull us.gcr.io/<ProjectID>/<AppName>:<BuildVersion>
¤ Service Account for Automation
» Steps To Create Service Account: https://cloud.google.com/iam/docs/service-accounts-create#iam-service-accounts-create-console
» Steps To Set Env Variable: https://cloud.google.com/docs/authentication/application-default-credentials#GAC
» Authentication methods: https://cloud.google.com/container-registry/docs/advanced-authentication
» Set up authentication for Docker: https://cloud.google.com/artifact-registry/docs/docker/authentication#json-key
For Windows:
move <Download Folder>\Google-Service-Account-Key.json <Sec-Sci AutoPT Directory>\Secrets\
gcloud auth activate-service-account <Google-Service-Account>@<ProjectID>.iam.gserviceaccount.com --key-file=<Sec-Sci AutoPT Directory>\Secrets\Google-Service-Account-Key.json
For Linux:
mv <Download Folder>/Google-Service-Account-Key.json /<Sec-Sci AutoPT Directory>/Secrets/
gcloud auth activate-service-account <Google-Service-Account>@<ProjectID>.iam.gserviceaccount.com --key-file=<Sec-Sci AutoPT Directory>/Secrets/Google-Service-Account-Key.json - Useful Commands
¤ Logout from all the accounts run the following command
gcloud auth revoke --all
¤ Logout from a specific account then run the following command
gcloud auth revoke <account_name>
- Node.JS: This is required only for non-Containerized acceptance testing.
- Installer: https://nodejs.org/en/download
- Download and setup Node.JS
- Run the following command to update Node.JS
For Windows:
npm install -g npm-windows-upgrade
npm-windows-upgrade
npm install -g npm
node --version
For Linux:
sudo apt-get update
sudo apt-get install nodejs
sudo npm install -g npm
node --version
- Cypress: This is required only for non-Containerized acceptance testing.
- Installer: https://docs.cypress.io/guides/getting-started/installing-cypress#Direct-download
- Download and Unzip Cypress package to Cypress folder in <Sec-Sci AutoPT Directory>
- Test Open Cypress
<Sec-Sci AutoPT Directory>/Cypress/cypress open - Run a test (firefox, edge, chrome, electron [default])
cd /to/project/path
npx cypress run -b edge --headless
npx cypress run -b edge --headless --spec "/cypress/path/to/filename.ts"
npx cypress run --spec "/cypress/path/to/filename.ts"
npx cypress run -C /cypress/path/to/filename.json
npm run e2e-run
¤ Change the Cypress location and update the Cypress version to use (eg: "version": "4.7.0")
For Windows:
notepad /project-path/node_modules/cypress/package.json
npx cypress verify
For Linux:
vim /project-path/node_modules/cypress/package.json
npx cypress verify
- Selenium and Robot Framework: This is required only for non-Containerized acceptance testing.
- Prerequisite: Python
- Run the following command to install Selenium and Robot Framework
cd <Sec-Sci AutoPT Installation Directory>
pip install -r rfw-requirements.txt - Download drivers for the browsers’ current versions
¤ Firefox Drivers: https://github.com/mozilla/geckodriver/releases
¤ Chrome Drivers: https://chromedriver.storage.googleapis.com/index.html - Move drivers to Drivers folder in <Sec-Sci AutoPT Directory>
For Windows:
move <Dowload Folder>driver.file <Sec-Sci AutoPT Directory>\Drivers\
For Linux:
mv <Dowload Folder>driver.file <Sec-Sci AutoPT Directory>/Drivers/ - Open .robot file using the following command
For Windows:
notepad /project-path/resources/filename.robot
For Linux:
vim /project-path/resources/filename.robot - Set BROWSER (firefox / chrome) and BASE_URL to the test script
* Settings *
Library SeleniumLibrary
* Variables *
${BASE_URL} https://domain.com
${BROWSER} chrome
* Keywords *
Start TestCase
Open Browser ${BASE_URL} ${BROWSER}
Finish TestCase
Close Browser - Run a test
cd /to/project/path
python -m robot acceptanceTests/webdocs.robot
- Java SE Development Kit:
-
Installer: https://www.jenkins.io/download
-
Jenkins requires Java 11, Java 17, or Java 21 (https://jdk.java.net/archive)
-
Download and setup Jenkins (use any port except 8080 which is the default port for Burp Proxy)
-
Pre-configure Jenkins to set Content Security Policy¤ Please note the URL, Port, Admin username and passworde.g., http://localhost:8181
¤ Open jenkins.xml to edit with text editor using the following command:
For Windows:
cd "<Jenkins Installation Directory>"
notepad jenkins.xml
For Linux:
cd "<Jenkins Installation Directory>"
vim jenkins.xml
¤ Set Jenkins Content Security Policy ( -Dhudson.model.DirectoryBrowserSupport.CSP ) under <arguments> tag
This is for Windows but in Linux it is the same pattern:
<executable>C:\jdk-11.0.16.101-hotspot\\bin\java.exe</executable>
<arguments>-Xrs -Xmx256m -Dhudson.lifecycle=hudson.lifecycle.WindowsServiceLifecycle -Dhudson.model.DirectoryBrowserSupport.CSP="default-src 'self'; style-src 'self' 'unsafe-inline';" -jar "C:\Program Files\Jenkins\jenkins.war" --httpPort=80 --webroot="%ProgramData%\Jenkins\war"</arguments>
Reference: https://www.jenkins.io/doc/book/security/configuring-content-security-policy
Step 4: Install Web Server (This is required for Sec-Sci AutoPT PenTest report dashboard)
- Cross-Platform, Apache, MySQL, PHP, and Perl (XAMPP ) -- RECOMMENDED!
- Installer: https://www.apachefriends.org/download.html
- Download and setup XAMPP
- Pre-configure XAMPP to set DocumentRoot directory
¤ Open httpd.conf to edit with text editor using the following command:
For Windows:
cd "<XAMPP Installation Directory>/apache/conf"
notepad httpd.conf
For Linux:
cd "<XAMPP Installation Directory>/apache/conf"
vim httpd.conf
¤ Set XAMPP DocumentRoot ( DocumentRoot ) under DocumentRoot section
DocumentRoot "<Sec-Sci AutoPT Directory>/Reports"
<Directory "<Sec-Sci AutoPT Directory>/Reports">
¤ Restart XAMPP
For Windows:
cd "<XAMPP Installation Directory>"
xampp-control.exe stop
xampp-control.exe start
For Linux:
cd "<XAMPP Installation Directory>"
sudo lampp stop
sudo start
- Installer: https://www.apachefriends.org/download.html
- or Internet Information Services (for Windows Only)
- To install IIS, open the Start menu
- Type "features" and select "Turn Windows features on or off"
- Tick the following options' check boxes and select OK.
- Internet Information Services
- World Wide Web Services
- Application Development Features
- .Net Extensibility 3.5
- .Net Extensibility 4.8
- ASP.Net 3.5
- ASP.Net 4.8
- ISAPI Extensions
- ISAPI Filters
- Security
- Basic Authentication
- Request Filtering
- Windows Authentication
- Install AspNetWebPages to resolve the "Parser Error Message: Could not load file or assembly 'System.Web.WebPages."
Installer name URL DLL Version AspNetWebPages.msi https://www.microsoft.com/en-us/download/confirmation.aspx?id=15979 1.0.0.0 AspNetWebPages2Setup.exe https://www.microsoft.com/en-us/download/details.aspx?id=34600 2.0.0.0
This will install the following dlls into the GAC MSIL (C:\windows\Microsoft.NET\assembly\GAC_MSIL):
¤ NuGet.Core
¤ System.Web.Helpers
¤ System.Web.Razor
¤ System.Web.WebPages
¤ System.Web.WebPages.Administration
¤ System.Web.WebPages.Deployment
¤ System.Web.WebPages.Razor
¤ WebMatrix.Data
¤ WebMatrix.WebData
¤ Microsoft.Web.Infrastructure
All of these DLLS have the same public key token: 31bf3856ad364e35
- To install IIS, open the Start menu
Configuring Sec-Sci AutoPT
Review the configuration files provided with Sec-Sci AutoPT. Customize them as needed to match the target environment and project-specific requirements.
Step 1.a: Set Keys.jks and Secrets.jks Keystores (Required if encrypt_all_creds='On' in autopt.conf) -- RECOMMENDED!
- Select encryption mode: Simple, Standard, or Extreme
¤ Simple Encryption Mode (encryption_mode='Simple'):
The following aliases must be setup before running the PenTest automation:
» keys_key in Credential Manager: This is the Keys.jks keystore password (other options to store keys_key, check autopt.conf).
» masterkey in Keys.jks: This is the encryption key to encrypt secrets (Keys.jks) and gpgpassphrase (Secrets.jks) that are stored in keystores and to encrypt passwords and API keys.
» secrets in Keys.jks: This is the the encrypted keystore password of Secrets.jks.
» gpgpassphrase in Secrets.jks: This is the encrypted password of GnuPG (GPG) that encrypts application credentials, secret keys, private keys, and certificates (.pfx, .pk12, .crt).
¤ Standard Encryption Mode (encryption_mode='Standard'):
The following aliases must be setup before running the PenTest automation:
» keys_key in Credential Manager: This is the Keys.jks kestore password (other options to store keys_key, check autopt.conf).
» masterkey in Keys.jks: This is the encryption key to encrypt secrets (Keys.jks) and masterkey (Secrets.jks) that are stored in keystores.
» secrets in Keys.jks: This is the the encrypted keystore password of Secrets.jks.
» masterkey in Secrets.jks: This is the encrypted key to encrypt gpgpassphrase (Secrets.jks) and masterkey (Secrets.jks) that are stored in keystores and to encrypt passwords and API keys.
» gpgpassphrase in Secrets.jks: This is the encrypted password of GnuPG (GPG) that encrypts application credentials, secret keys, private keys, and certificates (.pfx, .pk12, .crt).
¤ Extreme Encryption Mode (encryption_mode='Extreme'):
The following aliases must be setup before running the PenTest automation:
» extreme_key in Credential Manager: This is the encryption key to encrypt keys_key (in Credential Manager) and masterkey (in Keys.jks) that is stored in kestore (other options to store extreme_key, check autopt.conf).
» keys_key in Credential Manager: This is the encrypted Keys.jks kestore password (other options to store keys_key, check autopt.conf).
» masterkey in Keys.jks: This is the encrypted key to encrypt secrets (Keys.jks) and masterkey (Secrets.jks) that are stored in keystores.
» secrets in Keys.jks: This is the the encrypted keystore password of Secrets.jks.
» masterkey in Secrets.jks: This is the encrypted key to encrypt gpgpassphrase (Secrets.jks) and masterkey (Secrets.jks) that are stored in keystores and to encrypt passwords and API keys.
» gpgpassphrase in Secrets.jks: This is the encrypted password of GnuPG (GPG) that encrypts application credentials, secret keys, private keys, and certificates (.pfx, .pk12, .crt).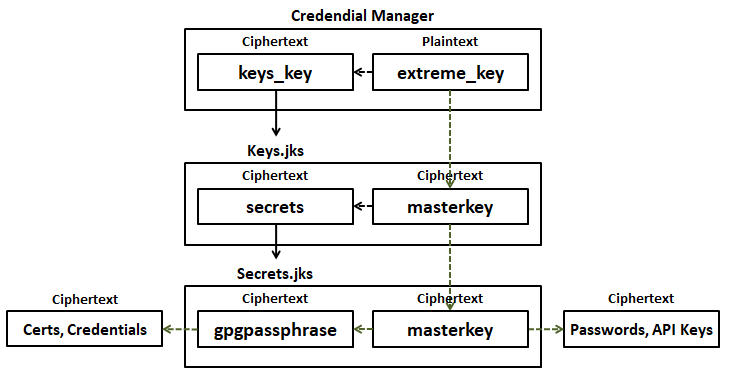
- To setup the above encryption modes, run the Setup Secrets tool using the following command:
Usage Syntax:
python setup_secrets.py -h
usage: setup_secrets.py [-h] [-t TYPE] [-xk EXTREMEKEY] [-xks EXTREMEKEYSALT] [-kk KEYSKEY] [-kmk KEYSMASTERKEY]
[-kmks KEYSMASTERKEYSALT] [-sk SECRETSKEY] [-smk SECRETSMASTERKEY]
[-smks SECRETSMASTERKEYSALT] [-gpg GPGPASS]
Sec-Sci AutoPT Setup Secrets v1.0
optional arguments:
-h, --help show this help message and exit
-t TYPE, --Type TYPE Encryption Type. [1] Simple; [2] Standard; [3] Extreme
-xk EXTREMEKEY, --ExtremeKey EXTREMEKEY
Enter Extreme key Password
-xks EXTREMEKEYSALT, --ExtremeKeySalt EXTREMEKEYSALT
Enter Extreme key Salt
-kk KEYSKEY, --KeysKey KEYSKEY
Enter Keys keystore key
-kmk KEYSMASTERKEY, --KeysMasterkey KEYSMASTERKEY
Enter Keys keystore Masterkey Password
-kmks KEYSMASTERKEYSALT, --KeysMasterkeySalt KEYSMASTERKEYSALT
Enter Keys keystore Masterkey Salt
-sk SECRETSKEY, --SecretsKey SECRETSKEY
Enter Secrets keystore key
-smk SECRETSMASTERKEY, --SecretsMasterkey SECRETSMASTERKEY
Enter Secrets keystore Masterkey Password
-smks SECRETSMASTERKEYSALT, --SecretsMasterkeySalt SECRETSMASTERKEYSALT
Enter Secrets keystore Masterkey Salt
-gpg GPGPASS, --GPGPass GPGPASS
Enter GNU Privacy Guard Passphrase - Useful commands:
List Keys in Keystore
keytool -list -v -keystore <keystore> -storepass <store-password>
Delete an Alias from Keystore
keytool -delete -alias <alias> -keystore <keystore> -storepass <store-password>
Change Keystore Password
keytool -storepasswd -keystore <keystore>
Import Password to Keystore
echo <password-to-store> | keytool -importpassword -keystore <keystore> -storepass <store-password> -alias <alias>
Step 1.b: Setting Up Encryption Based on Mode Types
Note: Passwords and passphrases used in this section are just for demo purposes. Please change accordingly.
- Simple Encryption Mode:
¤ Use with arguments (e.g.):
python setup_secrets.py -t 1 -kk Keys!Q1w2e3r4t5 -kmk KMasterKey!Q1w2e3r4t5 -kmks KSalt!Q1w2e3r4t5 -sk Secrets!Q1w2e3r4t5 -gpg GPG!Q1w2e3r4t5
¤ Use with the form (e.g.):
python setup_secrets.py
Select Encryption Type. [1] Simple; [2] Standard; [3] Extreme: 1
Enter Keys keystore key:
Re-enter Keys keystore key:
Enter Keys keystore Masterkey Password:
Re-enter Keys keystore Masterkey Password:
Enter Keys keystore Masterkey Salt:
Enter Secrets keystore key:
Re-enter Secrets keystore key:
Enter GNU Privacy Guard Passphrase:
Re-enter GNU Privacy Guard Passphrase:
Open Secrets\Simple_Mode_Instructions.txt and follow the instructions.
¤ Use Password Encryptor (password_encryptor.py) to encrypt passwords, api keys, and encryption passphase/password etc. (e.g.):
python password_encryptor.py -pk KMasterKey!Q1w2e3r4t5 -s KSalt!Q1w2e3r4t5 -p <PASSWORD_TO_ENCRYPT> - Standard Encryption Mode:
¤ Use with arguments (e.g.):
python setup_secrets.py -t 2 -kk Keys!Q1w2e3r4t5 -kmk KMasterKey!Q1w2e3r4t5 -kmks KSalt!Q1w2e3r4t5 -sk Secrets!Q1w2e3r4t5 -smk SMasterKey!Q1w2e3r4t5 -smks SSalt!Q1w2e3r4t5 -gpg GPG!Q1w2e3r4t5
¤ Use with the form (e.g.):
python setup_secrets.py
Select Encryption Type. [1] Simple; [2] Standard; [3] Extreme: 2
Enter Keys keystore key:
Re-enter Keys keystore key:
Enter Keys keystore Masterkey Password:
Re-enter Keys keystore Masterkey Password:
Enter Keys keystore Masterkey Salt:
Enter Secrets keystore key:
Re-enter Secrets keystore key:
Enter Secrets keystore Masterkey Password:
Re-enter Secrets keystore Masterkey Password:
Enter Secrets keystore Masterkey Salt:
Enter GNU Privacy Guard Passphrase:
Re-enter GNU Privacy Guard Passphrase:
Open Secrets\Standard_Mode_Instructions.txt and follow the instructions.
¤ Use Password Encryptor (password_encryptor.py) to encrypt passwords, api keys, and encryption passphase/password etc. (e.g.):
python password_encryptor.py -pk SMasterKey!Q1w2e3r4t5 -s SSalt!Q1w2e3r4t5 -p <PASSWORD_TO_ENCRYPT> - Extreme Encryption Mode:
¤ Use with arguments (e.g.):
python setup_secrets.py -t 3 -xk XTremeKey!Q1w2e3r4t5 -xks XSalt!Q1w2e3r4t5 -kk Keys!Q1w2e3r4t5 -kmk KMasterKey!Q1w2e3r4t5 -kmks KSalt!Q1w2e3r4t5 -sk Secrets!Q1w2e3r4t5 -smk SMasterKey!Q1w2e3r4t5 -smks SSalt!Q1w2e3r4t5 -gpg GPG!Q1w2e3r4t5
¤ Use with the form (e.g.):
python setup_secrets.py
Select Encryption Type. [1] Simple; [2] Standard; [3] Extreme: 3
Enter Extreme key Password:
Re-enter Extreme key Password:
Enter Extreme key Salt:
Enter Keys keystore key:
Re-enter Keys keystore key:
Enter Keys keystore Masterkey Password:
Re-enter Keys keystore Masterkey Password:
Enter Keys keystore Masterkey Salt:
Enter Secrets keystore key:
Re-enter Secrets keystore key:
Enter Secrets keystore Masterkey Password:
Re-enter Secrets keystore Masterkey Password:
Enter Secrets keystore Masterkey Salt:
Enter GNU Privacy Guard Passphrase:
Re-enter GNU Privacy Guard Passphrase:
Open Secrets\Extreme_Mode_Instructions.txt and follow the instructions.
¤ Use Password Encryptor (password_encryptor.py) to encrypt passwords, api keys, and encryption passphase/password etc. (e.g.):
python password_encryptor.py -pk SMasterKey!Q1w2e3r4t5 -s SSalt!Q1w2e3r4t5 -p <PASSWORD_TO_ENCRYPT>
Step 1.c: Encrypt Certificates, Environment Variables, and Credential Files (Optional)
- Run the File Encryptor using the following command:
Usage Syntax:
python file_encryptor.py -h
usage: file_encryptor.py [-h] [-a ACTION] [-f FOLDER]
Sec-Sci AutoPT File Encryptor v1.0
options:
-h, --help show this help message and exit
-a ACTION, --action ACTION
Options: encrypt or decrypt
-f FOLDER, --folder FOLDER
Enter folder path to encrypt or decrypt. Default value is <Sec-Sci_AutoPT>\Repo, <Sec-Sci_AutoPT>\Secrets
Encrypt Certificates and Credentials in Secrets and Repo folders:
python file_encryptor.py -a encrypt
Step 2: Set Sec-Sci AutoPT Configuration Variables
- Open autopt.conf to edit with text editor using the following command:
For Windows:
cd "/<Sec-Sci AutoPT Installation Directory>"
notepad autopt.conf
For Linux:
cd "/<Sec-Sci AutoPT Installation Directory>"
vim autopt.conf - Change the settings global variables according to the implementation
[Settings]
# Job Directory (If Different Folder Path Like Mapped Drive or Different Drive)
# If Not Set, Default Value is {Sec-Sci AutoPT Installation Directory}\Job
job_dir=''
# Workspace Directory (If Different Folder Path Like Mapped Drive or Different Drive)
# If Not Set, Default Value is {Sec-Sci AutoPT Installation Directory}\WS
ws_dir=''
# Repository Directory (If Different Folder Path Like Mapped Drive or Different Drive)
# If Not Set, Default Value is {Sec-Sci AutoPT Installation Directory}\Repo
repo_dir=''
# Reports Directory (If Different Folder Path Like Mapped Drive or Different Drive)
# If Not Set, Default Value is {Sec-Sci AutoPT Installation Directory}\Reports
reports_dir=''
# Secrets Directory (If Different Folder Path Like Mapped Drive or Different Drive)
# If Not Set, Default Value is {Sec-Sci AutoPT Installation Directory}\Secrets
secrets_dir=''
# Error Directory (If Different Folder Path Like Mapped Drive or Different Drive)
# If Not Set, Default Value is {Sec-Sci AutoPT Installation Directory}\Error_Logs
error_logs_dir=''
# Jenkins Home Directory
jenkins_home_dir='C:\\ProgramData\\Jenkins\\.jenkins'
# Java Bin Directory (For Running Burp)
java_dir='C:\\BurpSuitePro_v2023.8\\jre\\bin'
# Burpsuite Pro Directory
burp_dir='C:\\BurpSuitePro_v2023.8'
# Burpsuite Pro Temp Directory
burp_temp_dir='C:\\BurpSuitePro_v2023.8\\temp'
# Templates Directory (If Different Folder Path Like Mapped Drive or Different Drive)
# If Not Set, Default Value is {Sec-Sci AutoPT Installation Directory}\Templates
burp_templates_dir=''
# Use application previous scan Burp file: Yes or No
# Override can be applied in <application>.settings
use_app_burp_file='Yes'
# Burp Report Format: html, xml, html-xml
burp_report_format='html'
# Burp Host IP Address
proxy_host='127.0.0.1'
# Burp Host Port
proxy_port='8080'
# Browser Drivers Directory for Robot Framework
# If Not Set, Default Value is <Sec-Sci AutoPT Installation Directory>\Drivers
browser_driver_dir=''
# Admin Email
admin_email=This email address is being protected from spambots. You need JavaScript enabled to view it. ',This email address is being protected from spambots. You need JavaScript enabled to view it. '
email_sender=This email address is being protected from spambots. You need JavaScript enabled to view it. '
# Encrypt Passwords, Keys, and Certificates ('On' or 'Off' or 'Never')
# If encrypt_all_creds is 'On', Make sure to put the encrypted value of passwords and api_keys
# in this autopt.conf and in <application>.settings
encrypt_all_creds='Never'
# Options: Simple, Standard, Extreme
encryption_mode='Standard'
# GNU Privacy Guard Bin Directory
gpg_dir='C:\\gpg\\GnuPG\\bin'
# Java Keytool Directory
# If Not Set, Default Value is system java directory path
keytool_dir=''
# Location of Keys.jks Key
# Windows Credential Manager: 'wcm=target_name'
# KeyRing: 'kr=service_name,username'
# ENV Variable: 'env=var_name' or 'env=$var_name'
# Filesystem: 'fs=file_path'
# Windows Registry: reg=hive,subkey,value_name
# Constant Value are as follows:
# HKEY_USERS: HKU
# HKEY_CURRENT_USER: HKCU
# HKEY_CLASSES_ROOT: HKCR
# HKEY_LOCAL_MACHINE: HKLM
# HKEY_CURRENT_CONFIG: HKCC
# e.g. reg=HKLM,SOFTWARE\\keys_key,keys_key
keys_key='wcm=keys_key'
# Required for encryption_mode='Extreme'
# Location of keys_key encryption key
# Windows Credential Manager: 'wcm=target_name'
# KeyRing: 'kr=service_name,username'
# ENV Variable: 'env=var_name' or 'env=$var_name'
# Filesystem: 'fs=file_path'
# Windows Registry: 'reg=hive,subkey,value_name'
# Constant Value are as follows:
# HKEY_USERS: HKU
# HKEY_CURRENT_USER: HKCU
# HKEY_CLASSES_ROOT: HKCR
# HKEY_LOCAL_MACHINE: HKLM
# HKEY_CURRENT_CONFIG: HKCC
# e.g. reg=HKLM,SOFTWARE\\extreme_key,extreme_key
extreme_key='wcm=extreme_key'
# Options: sendgrid or SMTP
mailer='sendgrid'
# SendGrid API Details
sendgrid_url='https://api.sendgrid.com/v3/mail/send'
# If encrypt_all_creds='On', put the encrypted sendgrid_api_key
sendgrid_api_key='SENDGRID-API-KEY'
# SMTP Server Details
smtp_server='smtp.domain.com'
smtp_port=587
smtp_username=This email address is being protected from spambots. You need JavaScript enabled to view it. '
smtp_password='<SMTP-PASSWORD>'
# Docker Service Notice Interval in Hours
docker_service_notice_interval=4
# Docker Service Not Running Message
docker_service_error_subject='Docker Service Not Running'
docker_service_error_message='''
Hi AppSec Team,<br><br>
Docker Service is not running...<br><br>
Thanks,<br>
PenTest Automation Service
'''
# Image Pull Account Activation Error Message
image_pull_account_activation_error_subject='Image Pull Account Activation Error for {project_name}'
image_pull_account_activation_error_message='''
Hi {project_name} Team,<br><br>
Burp Scan is not completed.<br><br>
Image Pull Account Activation has encountered an error.<br><br>
<p style="font-family:'Courier New'"><b>Account Details: {pull_account}</b></p>
Thanks,<br>
AppSec Team
'''
# Docker Pull Error Message
docker_pull_error_subject='Docker Pull Error for {project_name}'
docker_pull_error_message='''
Hi {project_name} Team,<br><br>
Burp Scan is not completed.<br><br>
Docker Pull has encountered an error.<br><br>
<p style="font-family:'Courier New'"><b>$ docker pull {image_name}</b></p>
Thanks,<br>
AppSec Team
'''
# Robot Framework (rfw) and Cypress Compressed File Error Message
compressed_file_error_subject='Compressed Filed Error for {project_name}'
compressed_file_error_message='''
Hi {project_name} Team,<br><br>
Burp Scan is not completed.<br><br>
The <b>{compressed_file}</b> file is corrupted or damaged.<br><br>
Please check and repair <b>{compressed_file}</b> file then re-initiate the scan again.<br><br>
Thanks,<br>
AppSec Team
'''
# Successful Scan Message
report_url='https://reports.domain.com/?projectName='
success_scan_subject='Burp Scan Report for {project_name}'
success_scan_message='''
Hi {project_name} Team,<br><br>
Burp Scan successfully completed.<br><br>
The vulnerability scan report can be seen on the following link:<br><br>
{report_url}<br><br>
Thanks,<br>
AppSec Team
'''
Step 3.a: Import and Trust Burp Certificate
- Run Burpsuite Pro and download Burp certificate: http://localhost:8080
- Convert Burp Certificate from DER-form to PEM-form (CRT/CER)
openssl x509 -inform der -outform pem -in <burp-cert>.der -out <burp-cert>.crt - Trust Burp Certificate for Docker-Based Acceptance Testing on:
- Option 1: Add the following to the Dockerfile (for Linux-based)
COPY <burp-cert>.crt /usr/local/share/ca-certificates/<burp-cert>.crt
RUN apk update && apk --no-cache add ca-certificates && rm -rf /var/cache/apk/*
RUN update-ca-certificates
RUN apk --no-cache add curl - Option 2: Docker Container (for Linux-based)
docker run -v /path/to/burpt-cert-folder/ <docker-image-name>
cp <burp-cert>.crt /usr/local/share/ca-certificates/<burp-cert>.crt
update-ca-certificates
find / -type f -name burp*.crt
find / -name 'burp*.crt'
- Option 1: Add the following to the Dockerfile (for Linux-based)
- Trust Burp Certificate for Non-Docker-based Acceptance Testing on:
- Java Keystore (for Cucumber-based)
- Import certificate to the java keystore with keytool
keytool -import -trustcacerts -file <burp-cert>.der -alias BURPSUITE -keystore ..\lib\security\cacerts -storepass {password} - Check if added
keytool -keystore ..\lib\security\cacerts -list -storepass {password} | find "burp" - Run Burp & Test
java -jar -Dhttps.proxyHost=127.0.0.1 -Dhttps.proxyPort=8080 -Dcom.sun.net.ssl.checkRevocation=false -Dspring.profiles.active=acceptance-test,log-dev -Dcucumber.options="--tags @acceptance,@all" AppName-ccb.jar
- Import certificate to the java keystore with keytool
- Browsers (for Cypress- and Selenium/Robot Framework-based)
The process for installing Burp's CA certificate varies depending on which browser is used. Select the appropriate link below for detailed information about installing the certificate on chosen browser.
- Installing Burp's CA certificate in Firefox
https://portswigger.net/burp/documentation/desktop/getting-started/proxy-setup/certificate/firefox - Installing Burp's CA certificate in Chrome
https://portswigger.net/burp/documentation/desktop/getting-started/proxy-setup/certificate/chrome - Installing Burp's CA certificate in Safari
https://portswigger.net/burp/documentation/desktop/getting-started/proxy-setup/certificate/safari - Installing Burp's CA certificate in Internet Explorer
https://portswigger.net/burp/documentation/desktop/getting-started/proxy-setup/certificate/internet-explorer - Reference
https://portswigger.net/burp/documentation/desktop/getting-started/proxy-setup/certificate
- Installing Burp's CA certificate in Firefox
- Configure Browser Proxy (Set browser proxy to 127.0.0.1:8080)
- Configuring Firefox to work with Burp
https://portswigger.net/burp/documentation/desktop/getting-started/proxy-setup/browser/firefox - Configuring Chrome to work with Burp
https://portswigger.net/burp/documentation/desktop/getting-started/proxy-setup/browser/chrome - Configuring Safari to work with Burp
https://portswigger.net/burp/documentation/desktop/getting-started/proxy-setup/browser/safari - Configuring Internet Explorer to work with Burp
https://portswigger.net/burp/documentation/desktop/getting-started/proxy-setup/browser/internet-explorer - Reference
https://portswigger.net/burp/documentation/desktop/getting-started/proxy-setup/browser
- Configuring Firefox to work with Burp
- Java Keystore (for Cucumber-based)
Step 3.b (Alternative): Use Organization's Domain Certificate -- RECOMMENDED!
- Download an TLS Certificate from the Intermediate Server
- Download a Private Key from the Intermediate Server
- Convert a Certificate File to PKCS#12 Format
Prerequisites:
¤ Verify that OpenSSL is installed on the system. Download openssl from http://www.openssl.org.
¤ Verify that the root certificate of the SSL certificate that was returned by the CA is also available on the system.
Procedure:
1. Copy the CRT and KEY files to the OpenSSL installation directory.
For example:
cd <OpenSSL-Win32>\bin
2. Open a command prompt and, if necessary, navigate to the OpenSSL installation directory.
3. Generate a PKCS#12 keystore file using the certificate file and the private key.
For example:
openssl pkcs12 -export -out domain.com.p12 -in domain.com.pem -inkey domain.com.key -passout pass:Changeit!
In this example, domain.com.pem is client root certificate.
Copy the domain.com.p12 to <Sec-Sci AutoPT Installation Directory>\Secrets
Step 4: Configure Jenkins Token
- Login to Jenkins: e.g., http://localhost:8181
- Check location of JENKINS_HOME
Go to Dashboard > Manage Jenkins > System Information > Environment Variables : JENKINS_HOME - Generate User Token
- Go to Dashboard > Manage Jenkins > Users (Jenkins’ own user database)
- Add or choose username, click Configure, and click Add New Token (to Generate Token) under API Token
Note: Jot down the token value because this will only be shown once. - Save the configurations
- Go to Dashboard > Manage Jenkins > Users (Jenkins’ own user database)
Step 5: Configure Jenkins Job for Penetration Testing Automaton
- Using Containerized (Docker-Based) Acceptance Testing
- Download Jenkins Job Docker Template [ Docker-Windows-Template-dkr.rar | Docker-Linux-Template-dkr.rar ]
- Unzip Jenkins Job Docker Template and copy to %JENKINS_HOME%/jobs

- Restart Jenkins using the following command
For Windows:
net stop jenkins
net start jenkins
For Linux:
sudo systemctl stop jenkins
sudo systemctl start jenkins - Login to Jenkins: e.g., http://localhost:8181
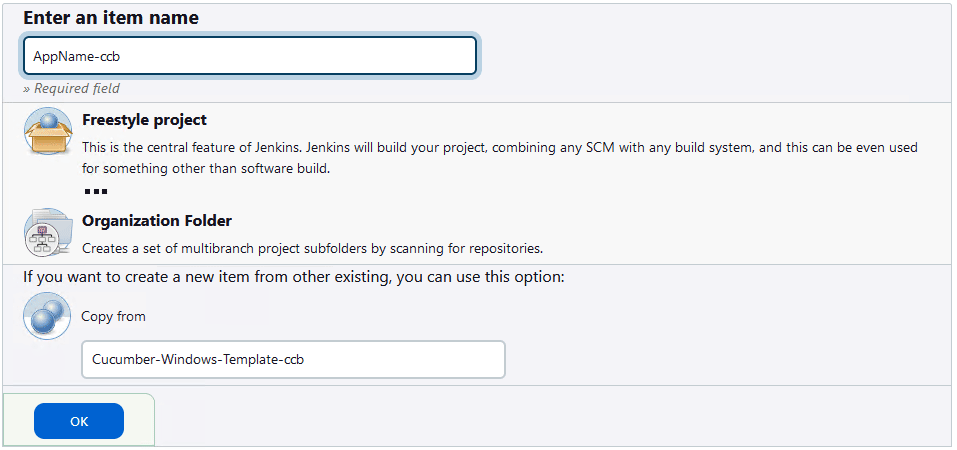
- Add new Job by clicking "+ New Item" from Dashboard
- Enter an item name (Job Name) and under "If you want to create a new item from other existing, you can use this option", supply "Copy from" value with "Docker-Windows-Template-dkr".
Note: Item Name (Application Name) format is {AppName}-{Type}. Type code is as follows:
¤ dkr is for Docker
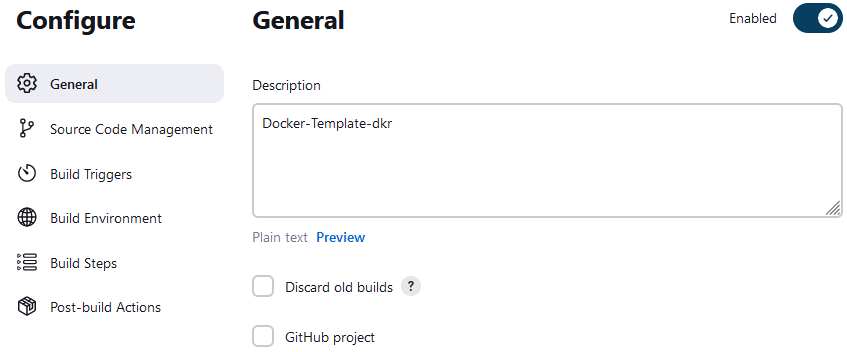
- Configure job item settings, set Description of the new job item under General section.
- Configure job item settings, set Authentication Token (Build Token) under Build Triggers section.

- Configure job item settings, change SecSciAutoPT with the Sec-Sci AutoPT installation directory.
For Windows:
For Linux:
- Run a PenTest job execution test (replace parameters witht the right values)
curl -X POST -u User:AuthToken http://autopt.domain.com/job/ProjectName/buildWithParameters/build?token=BuildToken \
-F imageName=DockerImageLocation \
-F env="@filePath/AppName-dkr.env" \
-F settings="@filePath/AppName-dkr.settings"
- Check the following folders if it contains all the files from the parameters
<Sec-Sci AutoPT installation directory>/Repo
|- AppName-dkr.env
|- AppName-dkr.settings
<Sec-Sci AutoPT installation directory>/Job
|- AppName-dkr.job
- Check the following folders if it contains all the files from the parameters
- Run Sec-Sci AutoPT framework execution test using the following command
cd <Sec-Sci AutoPT installation directory>
python secsci_autopt.py
For complete execution details, see "Sec-Sci AutoPT Implementation Diagram" section under "About Sec-Sci AutoPT" tab.
- Download Jenkins Job Docker Template [ Docker-Windows-Template-dkr.rar | Docker-Linux-Template-dkr.rar ]
- Using Non-Docker-Based Acceptance Testing
- Download Jenkins Job Template
- for Cucumber: [ Cucumber-Windows-Template-ccb.rar | Cucumber-Linux-Template-ccb.rar ]
- for Cypress: [ Cypress-Windows-Template-cyp.rar | Cypress-Linux-Template-cyp.rar ]
- for Robot Framework: [ RobotFramework-Windows-Template-rfw.rar | RobotFramework-Linux-Template-rfw.rar ]
- for Cucumber: [ Cucumber-Windows-Template-ccb.rar | Cucumber-Linux-Template-ccb.rar ]
- Unzip Jenkins Job Template and copy to %JENKINS_HOME%/jobs

- Restart Jenkins using the following command:
For Windows:
net stop jenkins
net start jenkins - For Linux:
sudo systemctl stop jenkins
sudo systemctl start jenkins - Login to Jenkins: e.g., http://localhost:8181
- Add new Job by clicking "+ New Item" from Dashboard
- Enter an item name (Job Name) and under "If you want to create a new item from other existing, you can use this option", supply "Copy from" value with:
- For Windows:
» for Cucumber, "Cucumber-Windows-Template-ccb"
» for Cypress, "Cypress-Windows-Template-cyp"
» for Robot Framework, "RobotFramework-Windows-Template-rfw"
- For Linux:
» for Cucumber, "Cucumber-Linux-Template-ccb"
» for Cypress, "Cypress-Linux-Template-cyp"
» for Robot Framework, "RobotFramework-Linux-Template-rfw"
- For Windows:
- Download Jenkins Job Template
Note: Item Name (Application Name) format is {AppName}-{Type}. Type codes are as follows:
-
-
- ccb is for Cucumber
- cyp is for Cypress
- rfw is for Robot Framework
- ccb is for Cucumber
-
-
- Configure job item settings, set Description of the new job item under General section.
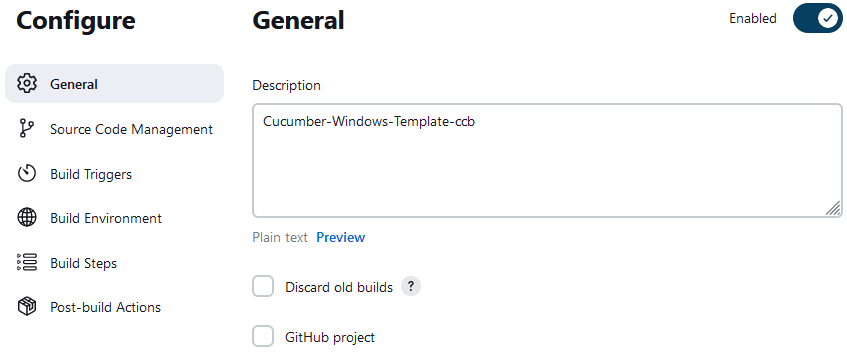
- Configure job item settings, set Authentication Token (Build Token) under Build Triggers section.
- Configure job item settings, change SecSciAutoPT with the Sec-Sci AutoPT installation directory.
For Windows:
For Linux:
- Run a PenTest job execution test (replace parameters with the right values).
- for Cucumber
curl -X POST -u User:AuthToken http://autopt.domain.com/job/ProjectName/buildWithParameters/build?token=BuildToken \
-F jar=filePath/AppName-ccb.jar \
-F settings="@filePath/AppName-ccb.settings" - for Cypress
curl -X POST -u User:AuthToken http://autopt.domain.com/job/ProjectName/buildWithParameters/build?token=BuildToken \
-F zip=filePath/AppName-cyp.zip \
-F settings="@filePath/AppName-cyp.settings" - for Robot Framework
curl -X POST -u User:AuthToken http://autopt.domain.com/job/ProjectName/buildWithParameters/build?token=BuildToken \
-F zip=filePath/AppName-rfw.zip \
-F settings="@filePath/AppName-rfw.settings" - Check the following folders if it contains all the files from the parameters.
¤ for Cucumber
<Sec-Sci AutoPT installation directory>/Repo
|- AppName-ccb.jar
|- AppName-ccb.settings
<Sec-Sci AutoPT installation directory>/Job
|- AppName-ccb.job
¤ for Cypress
<Sec-Sci AutoPT installation directory>/Repo
|- AppName-cyp.zip
|- AppName-cyp.settings
<Sec-Sci AutoPT installation directory>/Job
|- AppName-cyp.job
¤ for Robot Framework
<Sec-Sci AutoPT installation directory>/Repo
|- AppName-rfw.zip
|- AppName-rfw.settings
<Sec-Sci AutoPT installation directory>/Job
|- AppName-rfw.job
- for Cucumber
- Run Sec-Sci AutoPT framework execution test using the following command
Important: Open autopt.conf with text editor and verify environment variables are set correctly.
cd <Sec-Sci AutoPT installation directory>
python secsci-autopt.py
For complete execution details, see "Usage Syntax" and "Usage Examples" tabs.
- Configure job item settings, set Description of the new job item under General section.
Step 6: Integration
- Integrate Sec-Sci AutoPT with existing Continuous Integration (CI) or deployment pipeline if desired. This step ensures that penetration testing is automatically triggered during the build process.
- Simply put following curl command in the build pipeline steps:
curl -X POST -u User:AuthToken http://autopt.domain.com/job/ProjectName/buildWithParameters/build?token=BuildToken -F imageName=DockerImageLocation
Note: The above curl command can be used if there are no updates on Environment Variables (.env), Settings (.settings) among others. Check "Usage Syntax" and "Usage Examples" tabs for usage scenarios and options.
Step 7: Configure Sec-Sci AutoPT Report Dashboard
- XAMPP
Important: Confirm XAMPP DocumentRoot ( DocumentRoot ) under DocumentRoot section (refer to XAMPP installation under Intallation Guide tab ):
¤ Open httpd.conf to edit with text editor using the following command:
For Windows:
cd "<XAMPP Installation Directory>/apache/conf"
notepad httpd.conf
For Linux:
cd "<XAMPP Installation Directory>/apache/conf"
vim httpd.conf
¤ Set XAMPP DocumentRoot ( DocumentRoot ) under DocumentRoot section
DocumentRoot "<Sec-Sci AutoPT Directory>/Reports"
<Directory "<Sec-Sci AutoPT Directory>/Reports">- Restart XAMPP
For Windows:
cd "<XAMPP Installation Directory>"
xampp-control.exe stop
xampp-control.exe start
For Linux:
cd "<XAMPP Installation Directory>"
sudo lampp stop
sudo start -
Test Sec-Sci AutoPT Report Dashboard
-
Open web browser and type http://localhost in the address bar.
-
If you see the following page without error, this confirms the IIS configuration is successful.

» To setup IIS Authentication mechanism, please refer to https://learn.microsoft.com/en-us/iis/configuration/system.webserver/security/authentication -
Delete the following sample report files from Reports folder in Sec-Sci AutoPT installation directory
› AppName-ccb_.burp
› AppName-ccb_.burp.html
› AppName-cyp_.burp
› AppName-cyp_.burp.html
› AppName-dkr_.burp
› AppName-dkr_.burp.html
› AppName-rfw_.burp
› AppName-rfw_.burp.html
-
- Restart XAMPP
- or Internet Information Services
- Internet Information Services
- World Wide Web Services
- Application Development Features
- .Net Extensibility 3.5
- .Net Extensibility 4.8
- ASP.Net 3.5
- ASP.Net 4.8
- ISAPI Extensions
- ISAPI Filters
- Security
- Basic Authentication
- Request Filtering
- Windows Authentication
-
-
Open Internet Information Services (IIS) Manager
- Go to Control Panel > System and Security > Administrative Tools
- Click Internet Information Services (IIS) Manager

Alternatively, press "Windows Key + R" then type InetMgr.exe
- Go to Control Panel > System and Security > Administrative Tools
-
On the Internet Information Services (IIS) Manager, expand <Host Name or Computer Name>, expand Sites, and expand Default Web Site.
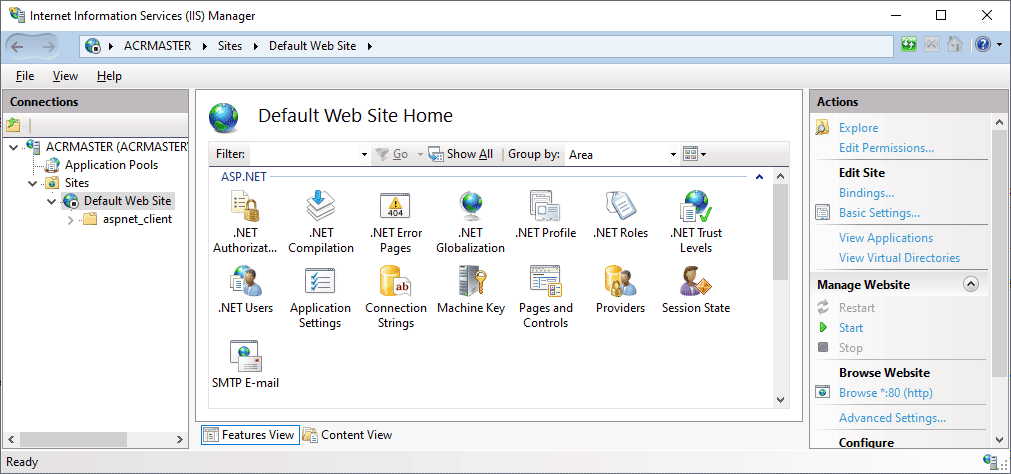
-
On the Actions pane, click Basic Settings.
- Set Physical path with Reports folder path from Sec-Sci AutoPT installation directory then click OK button.

- Set Physical path with Reports folder path from Sec-Sci AutoPT installation directory then click OK button.
-
On Manage Website pane, click Start to run Default Web Site.

-
Test Sec-Sci AutoPT Report Dashboard
-
Open web browser and type http://localhost in the address bar.
-
If you see the following page without error, this confirms the IIS configuration is successful.
» To setup IIS Authentication mechanism, please refer to https://learn.microsoft.com/en-us/iis/configuration/system.webserver/security/authentication -
Delete the following sample report files from Reports folder in Sec-Sci AutoPT installation directory
› AppName-ccb_.burp
› AppName-ccb_.burp.html
› AppName-cyp_.burp
› AppName-cyp_.burp.html
› AppName-dkr_.burp
› AppName-dkr_.burp.html
› AppName-rfw_.burp
› AppName-rfw_.burp.html
-
-
Step 8: Test Setup
- Set up a test environment to verify the correct functioning of Sec-Sci AutoPT.
- Execute a test run to ensure that the automated scanning and testing processes are working as intended.
Step 9: Documentation
- Refer to the provided documentation and user guides to gain a deeper understanding of Sec-Sci AutoPT's capabilities and how to leverage its features effectively.
Step 10: Training and Support
- Consider providing training to the relevant team members who will be using Sec-Sci AutoPT.
- Contact SEC-SCI dedicated support to address any issues or questions that may arise during implementation.
Step 11: Maintenance and Updates
- Regularly update Sec-Sci AutoPT and its integrated tools to access the latest features, improvements, and security patches.
- Implement a maintenance plan to keep the framework and its dependencies up-to-date.
By following these installation instructions, users can successfully set up and integrate Sec-Sci AutoPT into their secure software development lifecycle (SSDLC), enabling automated penetration testing and improved security posture for applications and systems.
Back to top
Usage Instructions
The provided usage instructions detail how to utilize the Sec-Sci AutoPT framework. It involves sending a POST request to trigger the vulnerability scanning process using a specific syntax. Before initiating the process, ensure necessary authentication credentials are secured, such as the "User", "AuthToken", and "BuildToken" for accessing the target server.
- Syntax For Docker:
curl -X POST -u User:AuthToken http://autopt.domain.com/job/ProjectName/buildWithParameters/build?token=BuildToken \
-F imageName=DockerImageLocation [ \
-F env="@filePath.env" \
-F settings="@filePath.settings" \
-F addFile="@filePath.ext" \
-F updateConfigOnly=Yes|No ]
The usage instructions offer various optional parameters that can be included in the POST request:
Parameter Description Sample Usage -u Specifies the user with authentication token (AuthToken). testuser:116edc21b2bc895fcd529bf61e3963ea57 token Specifies the build token (BuildToken). token=7famwli8aml5m36dz33z16d31ifc8101y5 -F imageName Specifies the location of Docker image from the repository. imageName=us.gcr.io/projectname/appname-acceptance-tests:latest -F env Specifies the local path of the environment variable file (download sample .env file).
Example Value:
Variable1=Value1
Variable2=Value2
VariableN=ValueNenv="@C:\AppName-dkr.env" -F settings Specifies the local path of the .settings file which contains recipients' emails and execution overrides for the PenTest (download sample .settings file).
Example Settings:
[Settings]
# Email report recipients
email_to=This email address is being protected from spambots. You need JavaScript enabled to view it. ',This email address is being protected from spambots. You need JavaScript enabled to view it. '
# Burp Custom Certificate in PKCS12 Format
burp_certificate='domain.com.p12'
# If encrypt_all_creds='On', put the encrypted burp_certificate_password
burp_certificate_password='<CERTIFICATE-PASSWORD>'
burp_template='api-custom-cert.burpoptions'
include_url='https://include.url1, https://include.url2'
exclude_url='https://exclude.url1, https://exclude.url2'
# Specify the host(s) for the target, or leave blank to match any item.
# An IP range can be specified instead of a hostname.
tls_pass_through_host='domain.com, sub.domain.com, 192.168.1.1'
# Use application previous scan Burp file: Yes or No
use_app_burp_file='Yes'
# Repository Type
# GCR for Google Container Registry
# JFR for JFrog
# LOCAL for Local Copy or Imported Image with 'local' tag
repository_type='gcr'
# Google Cloud Service Account to Pull Images
gcr_service_account=This email address is being protected from spambots. You need JavaScript enabled to view it. '
# Put the Key File in Secrets Folder
gcr_service_account_key=This email address is being protected from spambots. You need JavaScript enabled to view it. '
# JFrog Service Account to Pull Images
jfr_service_account=This email address is being protected from spambots. You need JavaScript enabled to view it. '
# Put the Key File in Secrets Folder
jfr_service_account_key=This email address is being protected from spambots. You need JavaScript enabled to view it. '
jfr_server='server.jfrog.io'
# Docker override
docker_volume='-v WSDir:/app/test/secrets/'
docker_entrypoint='--entrypoint node'
docker_entrypoint_script='test/smoke-test/smoke-tests.js'
docker_app_credential='smoke-tests-environ.json'
docker_app_crt=''
docker_app_pfx=''settings="@C:\AppName-dkr.settings" -F addFile Specifies the local path of additional file needed to run docker container. addFile="@C:\BigQueryAuth.json" -F updateConfigOnly Set execution type of execution. Default value is No.
No means execute PenTest Automation.
Yes means update PenTest related files only.updateConfigOnly=Yes - Syntax for Cucumber, Cypress, Selenium, and RobotFramework
curl -X POST -u User:AuthToken http://autopt.domain.com/job/ProjectName/buildWithParameters/build?token=BuildToken [ \
-F jar=filePath.jar|zip=filePath.zip \
-F settings="@filePath.settings" \
-F updateConfigOnly=Yes|No ]
The usage instructions offer various optional parameters that can be included in the POST request:
Parameter Description Sample Usage -u Specifies the user with authentication token (AuthToken). testuser:116edc21b2bc895fcd529bf61e3963ea57 token Specifies the build token (BuildToken). token=7famwli8aml5m36dz33z16d31ifc8101y5 -F jar|zip Specifies the local path of automation script.
jar is for Cucumber.
zip is for Robot Framework, Selenium and Cypressjar="@C:\BSP-Item-Availability-ccb.jar" -F settings Specifies the local path of the .settings file which contains recipients' emails and execution overrides for the PenTest.
Example Settings for Cucumber (download sample .settings file):
[Settings]
# Email report recipients
email_to=This email address is being protected from spambots. You need JavaScript enabled to view it. ',This email address is being protected from spambots. You need JavaScript enabled to view it. '
# Burp Custom Certificate in PKCS12 Format
burp_certificate='domain.com.p12'
# If encrypt_all_creds='On', put the encrypted burp_certificate_password
burp_certificate_password='<CERTIFICATE-PASSWORD>'
burp_template='api-custom-cert.burpoptions'
include_url='https://include.url1, https://include.url2'
exclude_url='https://exclude.url1, https://exclude.url2'
# Specify the host(s) for the target, or leave blank to match any item.
# An IP range can be specified instead of a hostname.
tls_pass_through_host='domain.com, sub.domain.com, 192.168.1.1'
# Use application previous scan Burp file: Yes or No
use_app_burp_file='Yes'
# Cucumber override
java_dir='C:\\jdk-11.0.16.101-hotspot\\bin'
java_option = '-Dspring.profiles.active=local-test,log-dev -Dcucumber.options="--tags @acceptance,@all,~@unit"'
Example Settings for RobotFramework (download sample .settings file):
[Settings]
# Email report recipients
email_to=This email address is being protected from spambots. You need JavaScript enabled to view it. ',This email address is being protected from spambots. You need JavaScript enabled to view it. '
# Burp Custom Certificate in PKCS12 Format
burp_certificate='domain.com.p12'
# If encrypt_all_creds='On', put the encrypted burp_certificate_password
burp_certificate_password='<CERTIFICATE-PASSWORD>'
burp_template='api-custom-cert.burpoptions'
include_url='https://include.url1, https://include.url2'
exclude_url='https://exclude.url1, https://exclude.url2'
# Specify the host(s) for the target, or leave blank to match any item.
# An IP range can be specified instead of a hostname.
tls_pass_through_host='domain.com, sub.domain.com, 192.168.1.1'
# Use application previous scan Burp file: Yes or No
use_app_burp_file='Yes'
# Robot Framework override
python_dir='C:\Python39'
robot_option='-m robot acceptanceTests\\webdocs.robot'
Example Settings for Cypress (download sample .settings file):
[Settings]
# Email report recipients
email_to=This email address is being protected from spambots. You need JavaScript enabled to view it. ',This email address is being protected from spambots. You need JavaScript enabled to view it. '
# Burp Custom Certificate in PKCS12 Format
burp_certificate='domain.com.p12'
# If encrypt_all_creds='On', put the encrypted burp_certificate_password
burp_certificate_password='<CERTIFICATE-PASSWORD>'
burp_template='api-custom-cert.burpoptions'
include_url='https://include.url1, https://include.url2'
exclude_url='https://exclude.url1, https://exclude.url2'
# Specify the host(s) for the target, or leave blank to match any item.
# An IP range can be specified instead of a hostname.
tls_pass_through_host='domain.com, sub.domain.com, 192.168.1.1'
# Use application previous scan Burp file: Yes or No
use_app_burp_file='Yes'
# Cypress override
cypress_dir='C:\\Sec-Sci_AutoPT\\Cypress'
cypress_option='-b electron --headless'settings="@C:\AppName-ccb.settings" -F updateConfigOnly Set execution type of execution. Default value is No.
No means execute PenTest Automation.
Yes means update PenTest related files only.updateConfigOnly=Yes
Usage Example Scenarios
Sec-Sci AutoPT presents a range of versatile applications across different testing scenarios. In containerized (Docker-based) acceptance testing as an input, the tool facilitates penetration testing by allowing users to tailor parameters such as environment variables, email recipients, overrides, and Burpsuite options, aligning the testing process with an organization's distinct setup. For non-Docker-based acceptance testing as an input, Sec-Sci AutoPT equally allowing users to customize parameters. Automated testing tools like Cucumber, it empowers security enhancement through parameter customization, ensuring a precise fit for Cucumber settings, email recipients, overrides, and Burpsuite options. Similarly, in the realm of Cypress and Robot Framework, the tool's adaptability shines through as users optimize security by configuring parameters to suit the unique demands of projects. In essence, Sec-Sci AutoPT serves as a flexible solution, catering to a diverse array of testing environments and scenarios, all while ensuring accurate and tailored security assessments.
Below are examples for several basic use cases to run penetration testing automation:
- For Containerized (Docker-Based) Acceptance Testing as an input
- Run PenTest with updated Environment Variables (.env) and Settings (.settings)
curl -X POST -u User:AuthToken http://autopt.domain.com/job/ProjectName/buildWithParameters/build?token=BuildToken \
-F imageName=DockerImageLocation \
-F env="@filePath/AppName-dkr.env" \
-F settings="@filePath/AppName-dkr.settings" - Run PenTest with updated Environment Variables (.env) only
curl -X POST -u User:AuthToken http://autopt.domain.com/job/ProjectName/buildWithParameters/build?token=BuildToken \
-F imageName=DockerImageLocation \
-F env="@filePath/AppName-dkr.env" - Run PenTest without changes on any settings
curl -X POST -u User:AuthToken http://autopt.domain.com/job/ProjectName/buildWithParameters/build?token=BuildToken \
-F imageName=DockerImageLocation
- Run PenTest with updated Environment Variables (.env) and Settings (.settings)
- Using Non-Docker-Based Acceptance Testing as an input
- for Cucumber
- Run PenTest with updated Cucumber Jar Runner (.jar) and Settings (.settings)
curl -X POST -u User:AuthToken http://autopt.domain.com/job/ProjectName/buildWithParameters/build?token=BuildToken \
-F jar=filePath/AppName-ccb.jar \
-F settings="@filePath/AppName-ccb.settings" - Run PenTest with updated Cucumber Jar Runner (.jar)
curl -X POST -u User:AuthToken http://autopt.domain.com/job/ProjectName/buildWithParameters/build?token=BuildToken \
-F jar=filePath/AppName-ccb.jar - Run PenTest without changes on jar runner and any settings
curl -X POST -u User:AuthToken http://autopt.domain.com/job/ProjectName/buildWithParameters/build?token=BuildToken
- Run PenTest with updated Cucumber Jar Runner (.jar) and Settings (.settings)
- for Cypress
- Run PenTest with updated Cypress Script (.zip) and Settings (.settings)
curl -X POST -u User:AuthToken http://autopt.domain.com/job/ProjectName/buildWithParameters/build?token=BuildToken \
-F zip=filePath/AppName-cyp.zip \
-F settings="@filePath/AppName-cyp.settings" - Run PenTest with updated Cypress Script (.zip)
curl -X POST -u User:AuthToken http://autopt.domain.com/job/ProjectName/buildWithParameters/build?token=BuildToken \
-F zip=filePath/AppName-cyp.zip - Run PenTest without changes on Cypress script and any settings
curl -X POST -u User:AuthToken http://autopt.domain.com/job/ProjectName/buildWithParameters/build?token=BuildToken
- Run PenTest with updated Cypress Script (.zip) and Settings (.settings)
- for Robot Framework
- Run PenTest with updated Robot Framework Script (.zip) and Settings (.settings)
curl -X POST -u User:AuthToken http://autopt.domain.com/job/ProjectName/buildWithParameters/build?token=BuildToken \
-F zip=filePath/AppName-rfw.zip \
-F settings="@filePath/AppName-rfw.settings" - Run PenTest with updated Robot Framework Script (.zip)
curl -X POST -u User:AuthToken http://autopt.domain.com/job/ProjectName/buildWithParameters/build?token=BuildToken \
-F zip=filePath/AppName-rfw.zip - Run PenTest without changes on RobotFramework script and any settings
curl -X POST -u User:AuthToken http://autopt.domain.com/job/ProjectName/buildWithParameters/build?token=BuildToken
- Run PenTest with updated Robot Framework Script (.zip) and Settings (.settings)
- for Cucumber