Author: Arnel C. Reyes
Published: 20 July 2024
Last Updated: 21 July 2024
Jailbreaking is the process of removing software restrictions imposed by Apple's iOS operating system on devices such as iPhones, iPads, and iPods. This process allows users to gain root access to the iOS file system and manager, enabling the installation of applications, extensions, and themes that are not available through the official Apple App Store. Jailbreaking an iPhone provides greater control and customization but should be approached with caution due to potential risks and legal considerations.
Important to Know About Jailbreaking
Purpose of Jailbreaking
- Customization: Personalize the device with themes, icons, and user interface modifications.
- Access to Unauthorized Apps: Install apps and tweaks from third-party repositories that are not available on the App Store.
- Enhanced Features: Unlock additional features and functionality that are restricted or limited by Apple.
Methods of Jailbreaking
- Untethered Jailbreak: A jailbreak that remains persistent through device reboots without the need to reapply the jailbreak each time.
- Tethered Jailbreak: Requires the device to be connected to a computer each time it is rebooted to reapply the jailbreak.
- Semi-Tethered Jailbreak: Allows the device to reboot without a computer, but jailbroken apps and tweaks will not function until the jailbreak is reapplied.
- Semi-Untethered Jailbreak: The device can reboot without a computer, but the jailbreak needs to be reactivated via an app on the device.
Popular Jailbreaking Tools
- Checkra1n: Uses the checkm8 exploit and supports devices from iPhone 5s to iPhone X.
- Unc0ver: Supports various iOS versions and provides a stable jailbreak experience.
- Taurine: Another tool offering a stable jailbreak for specific iOS versions.
Risks and Considerations
- Security Risks: Jailbreaking can expose the device to security vulnerabilities and malicious software.
- Stability Issues: Jailbroken devices may experience crashes, freezes, and reduced battery life.
- Voiding Warranty: Apple does not support jailbroken devices, which may void warranties and disqualify the device from official support.
- Reverting to Stock iOS: It is possible to restore a jailbroken device to its original state using iTunes or Finder, but this will remove all jailbreaking modifications.
Legal Implications
- Legality: In many regions, jailbreaking is legal for personal use but may violate the terms of service of iOS and Apple's End User License Agreement (EULA).
Best Practices
- Backup Data: Always back up the device data before attempting to jailbreak.
- Research: Thoroughly research the specific jailbreak tool and method for the device model and iOS version.
- Stay Updated: Keep abreast of the latest developments in jailbreaking to ensure compatibility and security.
The Procedures of Jailbreaking
Using checkra1n on Windows with a Bootable USB
Using checkra1n to jailbreak iPhone device by creating a bootable USB drive with checkra1n. This method involves running checkra1n in a Linux environment from a USB drive. Follow the following procedure:
Requirements:
- USB Drive: At least 1 GB.
- Rufus: A tool to create bootable USB drives.
- checkn1x: A Linux-based tool that includes checkra1n.
Steps:
- Download the Necessary Files:
• Rufus: Download from the official Rufus website (https://rufus.ie).
• checkn1x ISO: Download the latest ISO file from this GitHub repository (https://github.com/asineth0/checkn1x/releases). - Create a Bootable USB with checkn1x:
• Insert the USB drive into Windows PC.
• Open Rufus.
• In Rufus, select USB drive under "Device".
• Click "Select" and choose the downloaded checkn1x ISO file.
• Ensure the partition scheme is set to MBR and the file system is FAT32.
• Click "Start" to create the bootable USB.

- Boot into checkn1x:
• Restart computer and boot from the USB drive. This usually involves pressing a key like F12, F2, Esc, or Del during startup to open the boot menu (the exact key depends on the computer's manufacturer).
• Select the USB drive from the boot menu.
- Run checkra1n:
• Once checkn1x boots, command-line interface options is displayed.
• Press "Alt + F2" to start Checkra1n
• If "Alt + F3" is chosen to enter Checkra1n CLI-Mode, make sure the iPhone device is put to DFU mode
- Jailbreak the iPhone Device:
• Connect iPhone to the computer via USB.


• Follow the on-screen instructions to put the device into DFU mode:
» Hold the "Power" and "Home" buttons simultaneously for 4 seconds.
» Release the "Power" button but keep holding the "Home" button for another 10 seconds.


• Once the device is in DFU mode, checkra1n will automatically start the jailbreaking process.
• Wait for the process to complete. The device will reboot several times during the process.

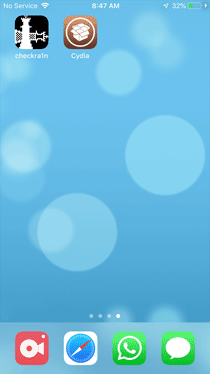
- Install Cydia:
• After the jailbreak process is complete, the Checkra1n loader app should be seen on home screen.
• Open the checkra1n loader app and install Cydia.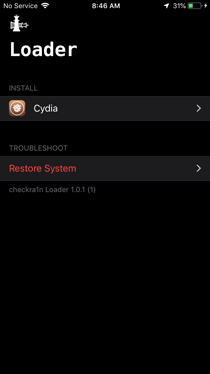
Post-Jailbreak Tips
- Rebooting:
» Remember, Checkra1n is a semi-tethered jailbreak, meaning it needs to run Checkra1n again from the bootable USB if the device reboots. - Cydia Tweaks:
» Be cautious when installing tweaks from Cydia, as some may not be compatible with iOS version or could cause instability. - Updates:
» Keep an eye on updates from the jailbreak community for new versions of Checkra1n and other tools.
By following these steps, this should be able to successfully jailbreak the iPhone device using Checkra1n on a Windows computer.
References
https://rufus.ie
https://checkra.in
https://winra1n.net
https://unc0ver.dev
Disclaimer: This documentation is intended for educational purposes only. The content provided herein is meant to inform and educate individuals about security practices, techniques, and tools. Security-Science does not support, endorse, or encourage any illegal or unethical activities, including but not limited to unauthorized access to computer systems, networks, or data. Users are advised to apply the knowledge gained responsibly and ensure compliance with all applicable laws and regulations. Security-Science shall not be held liable for any misuse of the information provided.